Sunday, April 3, 2016

How to build/compile from phonegap app to android app by using android sdk and phonegap cli?

This article lights the information about build Phonegap app to android App (someApp.apk).

Tools Required

You need to install the below tools, this article is not about how to install these tools. You will get
various information on the internet about installing process.

1) nodejs
2) Git

After installing this, run below command for installing latest phonegap cli

npm install -g phonegap@latest

Now install the Android SDK ide from Here.

Add environment variable

Create new environment path variable ANDROID_HOME and add your Android sdk path as shown in below image. My android sdk location is as mentioned below, it might differ in your case.

C:\Users\suman\AppData\Local\Android\sdk


Add the below line in PATH variable, follow the instruction as shown in below image

;%ANDROID_HOME%\platform-tools;%ANDROID_HOME%\tools;


Be careful, do not remove any other path when you would add ANDROID_HOME path variable.

Chek Android Sdk is installed

Now run the command android from your “command prompt”, below screen ensures that the android sdk is installed.


Now you have installed all required tools nodejs, git, phonegap cli, and android sdk. Now it's time to create and build a phonegap project.

Create phonegap Project

Make a phonegap project by running

phonegap create hello com.myapp.hello HelloWorld

Customize the app

Now, do customize your app as your requirement. After done this go to project directory by

cd hello

From your project folder, Add the platform for your app according to your requirement, it's Android in my case, so I initiate the command

phonegap platform add android

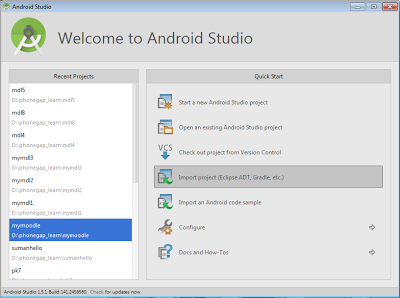
Now, import that created project hello in your Android Sdk IDE, for doing this open the android sdk and do click on link Import project (Eclipse ADT, Gradle etc) as in


After importing the project, select "Project Files" like


From here also you may able to customize the app as shown in below image


Build/Compile phonegap app to Android app

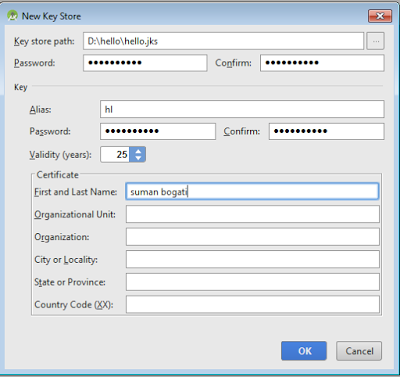
For compiling the app with your Android Sdk IDE, go to "Build -> Generate Signed APK",  and create the key for your app by providing required information as indicated by below image.


During the build process you can change the app file name as in my case it's myappname.apk,


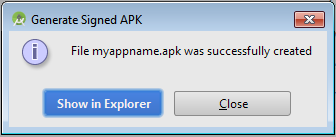
Move on as suggested by and Android Sdk IDE, After a while, the build process will be completed and the window is opened as below


Now the app mappname.apk is ready to install in your android phone.

Sunday, January 10, 2016

How to minify the css by using grunt.

By this article I would like to tell how to minify the css by using Grunt. I am not going to tell how to install nodejs and npm. We need this for run Grunt in our computer. I have provided the link through which you can get the information about install nodejs and npm.

There are few steps by which you would know how to minify the css through using grunt.

1) Install nodejs and npm by This.

2) Install Grunt Cli(command line interface) by running the command
    npm install -g grunt-cli
  
  -g indicates global which means by any where you can run the 'grunt' command
 
By running the command 'grunt', The below screen-shot will ensure 'grunt command line interface' is installed.


3) Create your project folder eg: myproject.
 .
4) In created project folder, make the file'package.json' for install grunt and it's css minimizer module. The content for this file would be
 {  
   "name" : "myproject",  
   "title" : "minycss",  
   "version" : "1.0.0",  
   "devDependencies": {  
     "grunt": "0.4.1",  
     "grunt-contrib-cssmin" : "0.6.1",  
   }  
 }  

5) Now from your project folder, run the command 'npm install' to install these modules(grunt, grunt-contrib-cssmin).
Now there will be installed the mentioned modules into node_modules folder.

6) Now create the Gruntfile.js file in your project folder(myproject). The content of Gruntfile.js file would be
 module.exports = function(grunt) {  
      grunt.initConfig({  
           pkg: grunt.file.readJSON('package.json'),  
           cssmin: {  
                mincss: {  
                     // src: ['*'], Minify all css files into one   
                     src: ['layout.css', 'color.css'], // For minimize the selected files from source folder  
                     dest: 'styles.min.css' // After minimized css of two files into one   
                }  
           }  
      });  
      grunt.loadNpmTasks('grunt-contrib-cssmin'); // grunt module for minimize css  
      grunt.registerTask('default', ['cssmin:mincss']); // registering task mincss  
 };  


7) Now from your project folder, run the grunt task by command 'grunt mincss'

After run this command there will be created the file called 'styles.min.css' in your project.

In Gruntfile.js file, the task mincss we have registered is doing main work, it's basically what doing is gets the all css from files layout.css and colors.css, After that it does combine and minify the css in single file called styles.min.css.

Saturday, March 7, 2015

What is nodejs?

Since long time I wanted to write about nodejs, So finally the day is came today.

Introduction
nodejs is a software by which we can use JavaScript on server side which means we can use the JavaScript for http request and can do read/write kind of operations on server.

It's not a web server like Apache, it does not do anything by itself, you have to create a server who handles about http request and response by using it's various modules.

nodejs is usually used for real time application, something like chat, audio, video etc. It is used for I/O kind of applications eg:- database reading/writing, make network connection etc. It uses the non-blocking concept for scalable network application. It uses V8 engine for great performance on server side. The V8 engine is made by google used in google-chrome browser for fast browser experience.

nodejs uses the JavaScript's asynchronous behavior(event loop), which means when you would apply the particular task for particular event and don't worry about that task, whenever that event is occurred that particular assigned task would be performed, so nodejs uses this nature of JavaScript for performance of scalable network application.
http requests for read operation

So here we would know how the nodejs increases the performance on scalable network  application.
As you can see in above image, there is multiple http requests for server santa, the request is about to read the content from database and response back to server and finally display the content in browser/computer.

With traditional way, the whole Process 1 http request for read page and response the page to server could take the long time, the Process 2 is not started until the Process 1 is finished. The RAM and it's CPU would be in idle state until the Process 1 is completed. So this blocking nature does waste the lot of RAM and CPU when large of users would come.

This kind of situation can be handled by multiple threads, However switching between threads and RAM does waste the memory and CPU.

JavaScript is single thread language, so how nodejs achieves huge performance let's see, as we already knew JavaScript has asynchronous behavior. At above figure, to start Process 2, there is no need to complete the Process 1. So second connection/http request can be made without completed first request which means the Process 2 could be started without finished Process 1.
We don't have wait here, So no extra expenses of RAM and CPU. That's how there could make a lot of concurrent connections at same time which increases the performance  on network scalable application .

Main Benefits

1) It uses the non-blocking concept.
2) It can handle lot of concurrent connections.
3) It uses the single thread for make lot of network connections.
4) Because of single thread, there is a lot of benefit on Memory and CPU of server.
5) Same context on client and server, which means we can use JavaScript both in client and server that we don't need to worry about the switching the programming language for client and server.

You can  get the nodejs from nodejs

Sunday, March 1, 2015

BrowserSync

What is browsersync?

It's a browser testing tool, When you make web pages for different browsers and different devices. Or you can say when you working on responsive  web pages, you need to check web pages on all these different devices and browsers, So testing work is really tedious when you make some changes on html/css files and test it into different devices with different browser. The tool "browsersync" makes the testing work is really easy, this is one of the best feature of browsersync.


Here some main features I have listed out.

Interaction sync
You can mirror the various user's interactions for different browsers like, On a sinlge browser, If a user click  a link, click on button or scroll the page, these all actions would be mirror on other browsers, Suppose If you perform click action on chrome browser, this action would be perform into firefox and safari automatically.

File sync
Whatever changes you made with html, css or images, this changes would be updated on browser automatically without page refresh, Suppose if there is only one tag <p >  is existing in your page, now you would add image with <img> tag then there is no need to page refresh in browser, there would automatically refresh the page and shows the image with <img > tag in browser.

Browser support,
Most of the time we have to test our web pages on different devices like computer, tablet, mobile etc. With the use of browsersync we can test the page  on a single device and the action would be mirror in other devices as well. Suppose if you are making changes on some files and testing it on a desktop computer, at the same time we can see the differences on other devices like tablet, mobile etc synchronously, so we can do perform an action on single device and mirror this action on all other devices.

Remote Debug:- You can do remote debug like, From your desktop computer  you will be able to do debug html page displaying in android phone ,  for it these separate device should be connected.

How to install?

What other things you required.

It's a module of nodejs package, For run this tools you need to installed nodejs on your computer.
After installed the nodejs you need one of these command to let run by CLI.

For install globally which means you can run browser-sync from anywhere.
$ npm install -g browser-sync

For install locally which means you can run browser-sync fom locally only.
$ npm install browser-sync --save-dev

Also you can use this tool with task runner like Grunt and Gulp.

Good Resource
https://www.youtube.com/watch?v=heNWfzc7ufQ

In future post, I will explore the answer of below questions.

How to use it?

How it works?


Saturday, July 19, 2014

Difference between absolute and relative position

One of my student was asking  differences about absolute and relative positions, So here some points I have described.                                                                                                                                      

Figure
Source Code

Absolute Position-

When you apply the absolute position to particular element, it would be detached from current flow.
Absolute position is the position which is related to nearest ancestor relative element, If there is no relative ancestor of absolute-positioned element, then it's related to document element.

For example at above figure, we applied absolute to green div,  and green's nearest ancestor relative element is orange div, so left and top of absolute position of green div would be apply from orange div.

If there is not applied relative position to orange div then the ancestor element would be document tag and the left and top value would be apply from document element rather than from orange div.

Relative Position:-

It respects the flow, when you apply the relative position to particular element then the left and top value would be apply from where this element originally is existing.

Like the blue div is existing at below the yellow div, After applied the relative position on blue div it would be moved from where(From below the yellow div) it is existing.

Saturday, July 12, 2014

About prototype

What prototype is?

Prototype is an object, in JavaScript, a constructor(function) has a prototype which has it's properties, and methods.

These properties and methods would be inherited to instance which is created from particular constructor. Here we go with the example,

var Transport = function (){
this.name = "car";
this.wheel = 4;
}

Transport.prototype.run = function (){
console.log("The " + this.name + " " + " run fast");
}

tp = new Transport();
tp.run(); //this car run fast

Prototype-Figure:-1 

Here  the method run()  is defined through the prototype to Transport constructor.

Why we need the prototype in this way as we can do simple like this.

var Transport = function (){
this.name = "car";
this.wheel = 4;
this.run = function (){
console.log("The " + this.name + " " + " run fast");
}
}

tp = new Transport();
tp.run(); //this car run fast

Every time the Transport is invoked this.run has an instance of Function constructor, For each instance of Transport, there would be  each different instance of Function for run method.

In simple words, If we have instances of Tranport() like

tp1 = new Transport();
tp2 = new Transport();

tp1 and tp2 have different instance of Function for run method which means
tp1.run == tup2.run is false.

Where the run method is performing same behavior for both instances tp1 and tp2.

So  at Prototype-Figure:-1, we defined the run method through the prototype object, in this case the run method would be shared over the instances tp1 and tp2.
Which means tp1.run and tp2.run have same instance of Function for run method in this yo case you could say.

tp1.run ==  tp2.run //true

Think about thousands instances are made from Transpor(). If we don't use prototype concept then thousand different function instances would be created for run method to thousand instances.

If we use prototype then there would be only one function instance for run method when the instances of Transport are created.


We have illustrated this concept with below figure,


Under the part of "before use prototype", you can see three object instances.

Each new instance of function is assigned to run method of particular object, so there is three instances of new functions are assigned to run when three objects are created. If there is thousand objects then there will be thousand new instances of function  which is not god.

If we assigned the run method with prototype object of constructor then various instances  point to the same function run from prototype object, as you can see  at part under "After user prototype", three instances(Mercidies, Ferari, hondaCity) are sharing the same method run.

So performance wise it does matter when the objects in thousands or more.

Prototype for inheritance.

Till EcmaScript 5, JavaScript does not have class concept like PHP, Java. To achieve this concept in JavaScript, Prototype is very useful.

Inheritance is important concept for Object oriented Concept. Below example show the inheritance concept in JavaScript.


var Transport = function(){
this.motion = "movable";
this.move = function(){
console.log(this.name + " does move according to speed and its " + this.motion);
}
}

var Car = function (name, color, price, sound){
this.name = name;
this.color = color;
this.price = price
this.sound = sound;
this.sounding  = function (){
console.log(this.name + "is souding " + this.sound);
}
}

Car.prototype = new Transport();

var hondaCity =  new Car("honda city", "black", "$10000", "smooth");
hondaCity.move();
hondaCity.sounding();


We have a super class Transport and sub class Car, As you can see by this line

Car.prototype = new Transport();

We have inherited the property 'motion' and method 'move' from Transport into Car. So Car has the property motion and method move that's why hondaCity.move() display the "honda city does move according to speed and its movable".

So prototype can be use to achieve inheritance concept in javaScript.

Still there is problem in above example, as above discussed there would be created the multiple function instances when we create the various instances from Car constructor. Here is the improved version.

We split-ed the move function from constructor defined by located outside from Transport constructor like

var Transport = function(){
this.motion = "movable";
}

Transport.prototype.move = function (){
console.log(this.name + " does move according to speed and its " + this.motion);
}

var Car = function (name, color, price, sound){
this.name = name;
this.color = color;
this.price = price
this.sound = sound;
this.sounding  = function (){
console.log(this.name + " is sounding " + this.sound);
}
}

Car.prototype = new Transport();

var hondaCity =  new Car("honda city", "black", "$10000", "smooth");
hondaCity.move();
hondaCity.sounding();

How prototype chain works

When we  use particular property/method on particular instance, then first of all it would be search on that instance, if found then okay otherwise search operation would be perform in prototype of constructor from which that instance is made, The search would  be continue to upper level until the search is found or top level constructor is found.

Here we go with example,

As we know every instance has internal pointer to prototype object and  prototype object points to the constructor,  so what if prototype object has instance of another constructor. In that case prototype object points to the prototype of another constructor.

Here we go with above example.


Car.prototype has an instance of Transport constructor so it does point to prototype of Transport.

So when we execute the hondaCity.move() first it would be search on hondaCity, not found then it would be search on Car prototype still not found now it would be search on prototype of Transport now it is found and executed.

Saturday, April 19, 2014

Unit testing with sinon.js

During the unit testing of javaScript project, I came to know about sinon.js, I have not fully explored about this, however want to share some basics on this. So

What is Sinon.js?

Sinon.js is moking framework, which makes your test automate. The framework is made by javascript and it  has lots of feature like:- spy, stub, fakeTimer, fakeXhr and fakeServer. Later in this article, I'll describe about some of them.

Why we need Sinon.js?

You definetly want to make your unit test automate as much as you can. Making test automate means it does not depend over other test. The test will be performed alone for result pass or fail. During the unit test at some point you need to external resource for your testing, like you need to validate to response of ajax request. Or you want to validate the reponse which is came from server and you may need to test callback function. For that you need mock external resoruce, Eg:- fake server which does response your data , fake xhr which does response your request.

So basically sinon.js makes test is easy, maintainable and automate. Lest have some explore about it's feature.

Spy
Spy is a function that stores the arugments, it's calls, returned value, Through the spy you may know, how your function is working in your system, like how many times it's invoked, with which arguments its invoked. Lets take a look example how its worked.

For testig I am using qUnit framework

function add(a, b){
    alert(a + b);
}

test("Fake server is working", function () {
    var callback = this.spy(add);
    callback(10, 20);
    ok(callback.calledOnce);
    ok(callback.calledWith(10, 20), 'called with arugments');

});

First test is passed because callback() is invoked only once
Second test is passed because callback is invoked with 10, 20 arugments.

Stub
Stubs are like spies with predefined behaviours, which means you can use stub when you want to force the function/method to think the way you want. It can use all the api of spies. When you don't want to invoke direct function/method for testing, at that time you can use stubs,

Here is the simple example.
test("Fake server is working", function () {
    var callback = sinon.stub();
    callback.withArgs(42).returns(52);
    alert(callback(42));
    equal(callback(42), 52);
});

Fake server
You can create the fake server to response the data of request to server from your browser, and you can validate that resopnsed data.

Here how you can create fake server.
test("data from server", function () {
   var server = this.sandbox.useFakeServer();
    server.respondWith("GET", "/mytest",
  [200, { "Content-Type": "application/json" },
      '[{ "id": "52", "name": "Rock" }]']);
var callback = this.spy();
$.ajax({
url: "/mytest",
success: callback
        });

server.respond();
equal(server.requests.length, 1, "server request length");
ok(callback.called, "spy called once"); //failed
ok(callback.calledWith([{ id: "52", name: "Rock" }]));       //failed
});

Here we are calling the ajax function, and fake server is responding expected data.
By calledWith() method, we are cheking the relative paramters are passing on succesfull callback function. Here is  LIVE DEMO

Ofcourse I will update this article when will grab more about this topic.

Unit testing with javascript

UNIT TESTING

Well, I wrote some unit test for my project before six months, After that, I had left it and I had been working on the code without unit testing, I realized it's really hard to maintain the code without unit testing, Lots of time I am consuming for manual testing and maintain the code as it's complexity is increasing , So I want to make my code very maintainable, modularize with automate testing by using unit test.

So in this context I want to write some basic points about unit testing,

Why we used unit testing?
First of all unit testing means you have to test each unit of your code, which means your code would be very modularize, for write unit testing you need to put your code into particular function, and the function/method would be tested, we expect to do particular action by that function.

Whatever problem will be occured in your application, you would know on which function/method it's affecting.
You can make changes code without worry about it's bad effect into code because after changes the code you can run all the test at once and can see it's effect on partcular part of the code. You can fix these issue by working on particular code if there is any.

I am using the qUnit testing framework for unit testing of my application, which is very simple to use, It has various assertion.

Main asserstion

Check for for boolean(true, false) value
ok(true);
This assertion is passed when the condition is true.

Check for value equalness
equal(fval, sval) 
This assertion is passed when fval and sval are true, fails if these are not equal

Check equalness of value and data type.
deepEqual(1, "1");
This assertion does check it's data type also, above test would be failed.

And also it is used to compare the object like,
deepEqual({fname:'suman'}, {fname:'suman'}); 
The above assertion would be passed.

When you need to do test asynchronous function then you can use asyncTest(), For example you have a replay() function which is executed for 2 seconds. You can write the code for testing like this.

asynchTest("testing for replay", function (){
    replay();
    setTimeout(
    function (){
//this lastId is last executed id from replay();
equal(lastid, 20, the last id should be 20);
}, 
2100
    );
});

Here we invoked the replay() function, after execute this function with 2 seconds, the value of lastId should be 20, so we would check this value by running test after 2.1(2100) seconds.

As I will grip more about this will update the article.

Saturday, March 29, 2014

About Branch in Git

What is branch in git.

Earlier  I did not know about branch, probably still need to more explore about this, however I am going to write some words for this.
Branch is a separator, created for  particular task while we are working on git. Every project has master branch, various task, improvements, bugs in git.

We created the sub branch for each new task, after completed this task we will do merge that branch along with the master branch.

Why we need to do branch?

Suppose we have a project, "File Tracking System", Now there is a bug  raised #213 and one of the developer is fixing this bug with created sub branch named 'bug-213', We supposed there is up-do-date code existing into git, and at the same time, there is critical new bug is came and need to fix that first, We'll have to work on this issue first and should work on other bug at later.

Now we do switch to main branch from working branch('bug-213') and fix that new bug and update it into git. Now we would like to work on earlier bug #213 so we do switch back to branch 'bug-213' from master branch. After fixed this problem, we will do merge this working branch to master branch.

One point need to be careful here that if  same file is modified in branch 'bug-213' and in a file(during the fixed of new bug) then there would be the conflict during the merge, we have to resolve that conflict first and do merge this branch 'bug-213' to master branch.

Here how do we create, switch and merge the branch.

For create a branch named bug-213
git checkout -b bug-213

For switch to branch bug-213
Switched to a new branch bug-213

For switch to master branch
git checkout master
Switched to branch 'master'

When you are in master branch run this command for merge bug-213 branch to master branch.
git merge  bug-213

After merged the branch successfully, you can remove this branch by

For remove the branch locally
git branch -d bug-213

For remove the branch remotely
git push origin : bug-213

I will do update the article when will do more explore more about topics.

Saturday, January 18, 2014

HTTP definition

HTTP is stands for Hyper Text Transfer protocol, It is a application layer protocol under TCP/IP. Basically it used for send the request from client to web server and it displays the response in relative format which is arrived from server into client.

For example if user type some URL into location bar of browser then through the HTTP client sends the request to Web server, and display the particular content in browser which is responsed by web server to client.

HTTP ensure that how the request send to the server and how the responded data would be display into client.

For example in which format the request from browser should be send to server, Is it GET, POST, or HEAD, which is ensured by HTTP.

Saturday, December 14, 2013

WebRTC Introduction with chart flow

WbRtc stands for web real time communication which means you can share the audio and video stream, aribitrary data peer to peer. The WebRTC api is open source project introduced by GOOGLE.

In a web without any plugin, audio and video chat was very complex but WebRtc makes it simpler.
Now you don't need to any kind of plugin or extra technology. WebRtc with javascript makes you comfortable for sharing video, audio and other data.

So here we know, how it works.
You need the following points for use WebRTC in your web application
1) getUserMedia()
2) RTCPeerConnection object
3) Data Sharing

By the getUserMedia() method we can get the audio and video stream in codec format through the microphone and webcam respectively.

By using RTCPeerConnection object and signaling method, there could be share the network information like IP addresses, information about height, width and  resolution of local video(as this information is created by getUserMedia), The signaling method can be any which, like socket.io with node.js, ajax, xmpp etc. It's on you  which one is suitable for you.

Data Channel
After shared the above information there would be started audio and video streaming between peers.

So here we go in Detail,
We are supposing the user Sam is caller at one browser in one place, he gets the codec information about local video and audio.

The Rocky(callee) at other browser in other place, he also gets the codec information about local video and audio.

After that, browsers of Sam and Rocky are create the RTCPeerConnection Object(RTCPC) respectively in each browser.

As we already knew, Sam got the local information(codec information) about audio and video,  now he sets this information as local description to RTCPeerConnection Object(RTCPC), now he sends 'Creates Offer' with this local description to Rocky.

After get the local decription from Sam, Rocky sets that information as remote description to RTCPC object on his side, at the same time he sets his local description about video and audio to RTCPC object on his side and send it to Sam with 'Creating Answer'.

After get the 'creating answer' from Rocky , Sam sets that information/description as remote description to RTCPC object on his side.

The handler of onIceCandidate event is triggered when the candidate is available at network, which means When Rocky would availble at network, handler of onIceCandidate of Sam is triggered and sends the information about candidate  to Rocky, after that addIceCandidate of Rocky's side would be triggered.

After exchange these information, there would start audio and video streaming between peers Sam and Rocky.


Here is the process in chart which is devided into number.

chart webrtc


This article is inspired from below tutorial you can get more information about WebRTC from here.http://www.html5rocks.com/en/tutorials/webrtc/basics/

Tuesday, July 23, 2013

Closure in JavaScript

What is Closure

To understand the closure in JavaScript seems to be difficult, but not really. Let’s understand the concept step by step.

The Closure is a function which has access to variables of its outer function, that’s it, Is not this awesome? Let’s dive into the example

	var color = "red";
	function display(){
		var color2 = "green";
		console.log('Color are ' + color +  ' and ' + color2);
	}
	display();
With above code,  variable color can be overridden unintentionally at any time which may affect the action of display function.

So how above code can be protected by using closure concept.

var getColor = function (){
	var color  = "red"; // this can be accessed by display function
	var display = function(){ // this is closure function
		var color2 = "green";
		console.log('Color are ' + color +  ' and ' + color2);
	}
	return display;
}
var colorObj = new getColor();
colorObj('yellow');

In the above example, the ‘display’ is closure function, it can access the “color” variable whenever this function will be invoked, but this variable can not be accessed from outside of getColor function, so it’s safe for being override.

What’s is the benefit of using Closure?

By using the Closure, we can make our code private, clean, and variables can not be modified by unintentionally.

Seperate enviroment with Closure

In below example, every time the getColor is invoked there will create the exclusive environment with closure and it’s related variables.  For example

var getColor = function (color){
	var color  = color; 
	var display = function(){ 
		var color2 = "green";
		console.log('Color are ' + color +  ' and ' + color2);
	}
	return display;
}

var colorObj1 = new getColor('red');
var colorObj2 = new getColor('blue');

colorObj1('yellow');
colorObj2('geeen'); 

new getColor('red'); and  new getColor('blue'); create the specific environment.  The environment has its own variable values red and blue with its own closure. Below figure shows the enviroment for above code


After invoking the closure function display,  it uses the value which was passed during the getColor() function called.

What happens when closure is used under the loop

function display(color){
	console.log('color is ' + color);
}
var getColor = function (){
	var onColors = [];
	var colors  = ['red', 'green', 'blue']; 
	for(var i=0; i < colors.length; i++){
		onColors[i] = function(){
			display(colors[i]);
		};
	}
	return  onColors;
}
var onColors = getColor();
onColors[0]();

In the above code, when we invoke the function onColors[0](); It suppose to display red color but It does not happen, because when the display() closure is invoked, the i has been reached to 3, so the output is “color is undefined”.

Under the loop, the getColor is not able to create the individual environment because of which the i’s value 3 is shared to all closures onColors[i].

So we need to make the individual environment for each closure and it’ related variables under the loop. Let's see how do we achieve this.

	function display(color){
		console.log('color is ' + color);
	}
	
	function eachColorEnvironment(color){
		return function (){
			display(color);
		}
	}
	
	var getColor = function (){
		var onColors = [];
		var colors  = ['red', 'green', 'blue']; 
		for(var i=0; i < colors.length; i++){
			onColors[i] = eachColorEnvironment(colors[i]);
		}
		return  onColors;
	}
	
	var onColors = new getColor();
	onColors[0]();

In this example, onColors[0](); renders the output “color is red”. Now getColor() is able to create separate environment with specific value and closure from eachColorEnvironment, as following,

First environment => Red and Closure


Second environment => Green and Closure


Third environment => Blue and Closure

Use “let” instead of  Closure.
	function display(color){
		console.log('color is ' + color);
	}
	
	var getColor = function (){
		var onColors = [];
		var colors  = ['red', 'green', 'blue']; 
		for(var i=0; i < colors.length; i++){
			let color = colors[i];
			onColors[i] = function (){
				display(color);
			}
		}
		return  onColors;
	}
	
	var onColors = new getColor();
	onColors[0]();
	
We can use the let keyword to handle this situation, this keyword can be used for block scope variable, so let color = “colors[i]” defines the private variable for its own closures.
let color = colors[i];
onColors[i] = function (){ display(color);}	

You can get the various examples about Closure.